Search This Blog

Showing posts with label Programming Tips. Show all posts

How to debug the app use framework laravel

How to debug the app use framework laravel: 

  • Start the app by command:
    php -dxdebug.remote_enable=1 -dxdebug.remote_mode=req -dxdebug.remote_port=9000 -dxdebug.remote_host=127.0.0.1 artisan serve
  • In PhpStorm: click menu Run/Start listening for Php  debug connections
  • In php.ini: add lines: 
    [Xdebug]
    zend_extension="E:/AppServ\php-7.2.29\ext\php_xdebug.dll"
    xdebug.remote_enable=1
    xdebug.remote_host=localhost
    xdebug.remote_port=9000
    xdebug.remote_mode=req
    xdebug.remote_handler="dbgp"
    ;xdebug.idekey="netbeans-xdebug"
    xdebug.idekey="PHPSTORM"
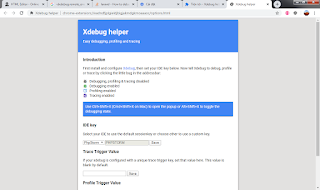
  • In Chrome: install addons Xdebug helper and config such as picture below
  • Run the app in Chrome and debug normal
Share:

ReportTDK for Jsp

ReportTDK for jsp allows to create report excel from template excel with a few lines of code.

Features:

  • Support parts: Detail, Group, Group Footer, Total
  • Support style, format for cell
  • Support formulas in Detail ( such as:=C5*D5), Group,Total ( such as: =SUMIF(J$7,"1",I$7), I is column to get SUM, J is column to compare to 1, 7 id row of Detail)
  • Allow to set protectec password for report to anti edit

Demos:

Code Demo:

  $report= new Reportx($vtRS, $strTemplatePath, $strReportPath);

  $strReportDate = date('d/m/y');
  $report->setParameter('$ReportDate', $strReportDate);

  $report->fillDataToExcel(false);

  $report->unInit();

Contact:

Share:

ReportTDK for Php

ReportTDK for php allows to create report excel from template excel with a few lines of code.

Features:

  • Support parts: Detail, Group, Total
  • Support style, format for cell
  • Support formulas in Detail ( such as:=C5*D5), Group,Total ( such as: =SUMIF(J$7,"1",I$7), I is column to get SUM, J is column to compare to 1, 7 id row of Detail)

Demos:

Code Demo:

  $report= new Reportx($vtRS, $strTemplatePath, $strReportPath);

  $strReportDate = date('d/m/y');
  $report->setParameter('$ReportDate', $strReportDate);

  $report->fillDataToExcel(false);

  $report->unInit();

Contact:

Share:

CSS Syntax and Selectors in Html

 A CSS comprises of style rules that are interpreted by the browser and then applied to the corresponding elements in your document

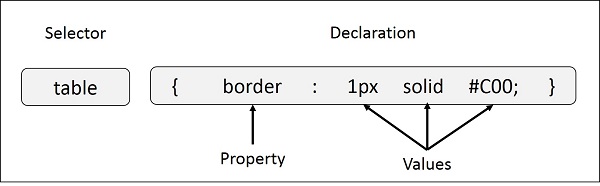
A style rule is made of three parts:
 - Selector:A selector is an HTML tag at which a style will be applied. This could be any tag like <h1> or <table> etc.
 - Property: A property is a type of attribute of HTML tag. Put simply, all the HTML attributes are converted into CSS properties. They could be color, border etc.
 - Value: Values are assigned to properties. For example, color property can have value either red or #F1F1F1 etc.

You can put CSS Style Rule Syntax as follows:
selector { property: value }

Syntax

Example − You can define a table border as follows:
table{ border :1px solid #C00; }

Here table is a selector and border is a property and given value 1px solid #C00 is the value of that property.
You can define selectors in various simple ways based on your comfort. Let me put these selectors one by one.

The Type Selectors
This is the same selector we have seen above. Again, one more example to give a color to all level 1 headings −
h1 {
   color: #36CFFF; 
}
The Universal Selectors
Rather than selecting elements of a specific type, the universal selector quite simply matches the name of any element type −
* { 
   color: #000000; 
}
This rule renders the content of every element in our document in black.

The Descendant Selectors
Suppose you want to apply a style rule to a particular element only when it lies inside a particular element. As given in the following example, style rule will apply to <em> element only when it lies inside <ul> tag.
ul em {
   color: #000000; 
}
The Class Selectors
You can define style rules based on the class attribute of the elements. All the elements having that class will be formatted according to the defined rule.
.black {
   color: #000000; 
}
This rule renders the content in black for every element with class attribute set to black in our document. You can make it a bit more particular. For example −
h1.black {
   color: #000000; 
}
This rule renders the content in black for only <h1> elements with class attribute set to black.

You can apply more than one class selectors to given element. Consider the following example −
<p class = "center bold">
   This para will be styled by the classes center and bold.
</p>
The ID Selectors
You can define style rules based on the id attribute of the elements. All the elements having that id will be formatted according to the defined rule.
#black {
   color: #000000; 
}
This rule renders the content in black for every element with id attribute set to black in our document. You can make it a bit more particular. For example −
h1#black {
   color: #000000; 
}
This rule renders the content in black for only <h1> elements with id attribute set to black.

The true power of id selectors is when they are used as the foundation for descendant selectors, For example −
#black h2 {
   color: #000000; 
}
In this example all level 2 headings will be displayed in black color when those headings will lie with in tags having id attribute set to black.

The Child Selectors
You have seen the descendant selectors. There is one more type of selector, which is very similar to descendants but have different functionality. Consider the following example −
body > p {
   color: #000000; 
}
This rule will render all the paragraphs in black if they are direct child of <body> element. Other paragraphs put inside other elements like <div> or <td> would not have any effect of this rule.

The Attribute Selectors
You can also apply styles to HTML elements with particular attributes. The style rule below will match all the input elements having a type attribute with a value of text −
input[type = "text"] {
   color: #000000; 
}
The advantage to this method is that the <input type = "submit" /> element is unaffected, and the color applied only to the desired text fields.

There are following rules applied to attribute selector.
 - p[lang]: Selects all paragraph elements with a lang attribute.
 - p[lang="fr"]: Selects all paragraph elements whose lang attribute has a value of exactly "fr".
 - p[lang~="fr"]: Selects all paragraph elements whose lang attribute contains the word "fr".
 - p[lang|="en"]: Selects all paragraph elements whose lang attribute contains values that are exactly "en", or begin with "en-".

Multiple Style Rules
You may need to define multiple style rules for a single element. You can define these rules to combine multiple properties and corresponding values into a single block as defined in the following example −
h1 {
   color: #36C;
   font-weight: normal;
   letter-spacing: .4em;
   margin-bottom: 1em;
   text-transform: lowercase;
}
Here all the property and value pairs are separated by a semicolon (;). You can keep them in a single line or multiple lines. For better readability, we keep them in separate lines.

For a while, don't bother about the properties mentioned in the above block. These properties will be explained in the coming chapters and you can find complete detail about properties in CSS References

Grouping Selectors
You can apply a style to many selectors if you like. Just separate the selectors with a comma, as given in the following example −
h1, h2, h3 {
   color: #36C;
   font-weight: normal;
   letter-spacing: .4em;
   margin-bottom: 1em;
   text-transform: lowercase;
}
This define style rule will be applicable to h1, h2 and h3 element as well. The order of the list is irrelevant. All the elements in the selector will have the corresponding declarations applied to them.

You can combine the various id selectors together as shown below −
#content, #footer, #supplement {
   position: absolute;
   left: 510px;
   width: 200px;
}
Share:

How to use style sheet (css)

 You can use CSS in three ways in your HTML document:
  - External Style Sheet: Define style sheet rules in a separate .css file and then include that file in your HTML document using HTML <link> tag.
  - Internal Style Sheet: Define style sheet rules in header section of the HTML document using <style> tag.
  - Inline Style Sheet: Define style sheet rules directly along-with the HTML elements using style attribute.

Let's see all the three cases one by one with the help of suitable examples.

External Style Sheet
If you need to use your style sheet to various pages, then its always recommended to define a common style sheet in a separate file. A cascading style sheet file will have extension as .css and it will be included in HTML files using <link> tag.

Example
Consider we define a style sheet file style.css which has following rules −
.red {
   color: red;
}
.thick {
   font-size:20px;
}
.green {
   color:green;
}

Here we defined three CSS rules which will be applicable to three different classes defined for the HTML tags. I suggest you should not bother about how these rules are being defined because you will learn them while studying CSS. Now let's make use of the above external CSS file in our following HTML document −
<!DOCTYPE html>
<html>

   <head>
      <title>HTML External CSS</title>
      <link rel = "stylesheet" type = "text/css" href = "/html/style.css">
   </head>

   <body>
      <p class = "red">This is red</p>
      <p class = "thick">This is thick</p>
      <p class = "green">This is green</p>
      <p class = "thick green">This is thick and green</p>
   </body>

</html>

This will produce the following result −


Internal Style Sheet
If you want to apply Style Sheet rules to a single document only, then you can include those rules in header section of the HTML document using <style> tag.

Rules defined in internal style sheet overrides the rules defined in an external CSS file.

Example
Let's re-write above example once again, but here we will write style sheet rules in the same HTML document using <style> tag −
<!DOCTYPE html> 
<html>
 
   <head> 
      <title>HTML Internal CSS</title> 
      
      <style type = "text/css"> 
         .red { 
            color: red; 
         } 
         .thick{ 
            font-size:20px; 
         } 
         .green { 
            color:green; 
         } 
      </style> 
   </head>
 
   <body> 
      <p class = "red">This is red</p>  
      <p class = "thick">This is thick</p>  
      <p class = "green">This is green</p>  
      <p class = "thick green">This is thick and green</p> 
   </body>
 
</html>
This will produce the following result −


Inline Style Sheet
You can apply style sheet rules directly to any HTML element using style attribute of the relevant tag. This should be done only when you are interested to make a particular change in any HTML element only.

Rules defined inline with the element overrides the rules defined in an external CSS file as well as the rules defined in <style> element.

Example
Let's re-write above example once again, but here we will write style sheet rules along with the HTML elements using style attribute of those elements.
<!DOCTYPE html> 
<html>
 
   <head> 
      <title>HTML Inline CSS</title> 
   </head>
 
   <body> 
      <p style = "color:red;">This is red</p>  
      <p style = "font-size:20px;">This is thick</p>  
      <p style = "color:green;">This is green</p>  
      <p style = "color:green;font-size:20px;">This is thick and green</p> 
   </body>
 
</html> 
This will produce the following result −

Share:

Most commonly used tags in HTML

 HTML contains lots of predefined tag. Some of them are described below:
Document structure tag:
HTML tag: It is the root of the html document which is used to specify that the document is html.
Syntax:
<html> Statements... </html>

Example:
<html> 
    <head>  
        <title>Title of your web page</title>  
    </head>  
    <body>HTML web page contents </body>  
</html> 

Head tag: Head tag is used to contain all the head element in the html file. It contains the title, style, meta, … etc tag.
Syntax:
<head> Statements... </head>

Example:
<head>Contains elements describing the document</head>

Body tag: It is used to define the body of html document. It contains image, tables, lists, … etc.
Syntax:
<body> Statements... </body>

Example:
<body>The content of your HTML page</body> 

Title tag: It is used to define the title of html document.
Syntax:
<title> Statements... </title>
Example:
<tittle>tab name</tittle> 

Content container tag:
Heading tag: It is used to define the heading of html document.
Syntax:
<h1> Statements... </h>
<h2> Statements... </h2>
<h3> Statements... </h3>
<h4> Statements... </h4>
<h5> Statements... </h5>
<h6> Statements... </h6>

Example:
<h1>Heading 1 </h1>   
<h2>Heading 2 </h2> 
<h3>Heading 3 </h3>  
<h4>Heading 4 </h4>  
<h5>Heading 5 </h5>  
<h6>Heading 6 </h6> 

Paragraph tag: It is used to define paragraph content in html document.
Syntax:
<p> Statements... </p>
Example:
<p>GeeksforGeeks: Computer science portal</p> 

Emphasis tag: It is used to renders as emphasized text.
Syntax:
<em> Statements... </em>
Example:
<em>GeeksforGeeks</em> 

Bold tag: It is used to specify bold content in html document.
Syntax:
<b> Statements... </b>

Example:
<b>Bold word</b> 

Italic tag: It is used to write the content in italic format.
Syntax:
<i> Statements... </i>

Example:
<i>GeeksforGeeks</i> 

Small (text) tag: It is used to set the small font size of the content.
Syntax:
<small> Statements... </small>

Example:
<small>Example</small> 

Underline tag: It is used to set the content underline.
Syntax:
<u> Statements... </u>

Example:
<u>GeeksforGeeks</u> 

Deleted text tag: It is used to represent as deleted text. It cross the text content.
Syntax:
<strike> Statements... </strike>

Example:
<strike>GeeksforGeeks</strike> 

Anchor tag: It is used to link one page to another page.
Syntax:
<a href="..."> Statements... </a>

Example:
<a href="https://www.geeksforgeeks.org/"> GeeksforGeeks</a> 

List tag: It is used to list the content.
Syntax:
<li> Statements... </li>

Example:
<li>List item 1</li>  
<li>List item 2</li> 

Ordered List tag: It is used to list the content in a particular order.
Syntax:
<ol> Statements... </ol>

Example:
<ol>  
     <li>List item 1</li>  
     <li>List item 2</li> 
     <li>List item 3</li>  
     <li>List item 4</li>  
</ol>  

Unordered List tag: It is used to list the content without order.
Syntax:
<ul> Statements... </ul>

Example:
<ul>  
     <li>List item 1</li>  
     <li>List item 2</li> 
     <li>List item 3</li>  
     <li>List item 4</li>  
</ul>  

Comment tag: It is used to set the comment in html document. It is not visible on the browser.
Syntax:
<!-- Statements... -->

Example:
<!--Comment section-->

Scrolling Text tag: It is used to scroll the text or image content.
Syntax:
<marquee> Statements... </marquee>

Example:
<marquee bgcolor="#cccccc" loop="-1"scrollamount="2" width="100%"> Example Marquee</marquee> 

Center tag: It is used to set the content into the center.
Syntax:
<center> Statements... </center>

Example:
<center>GeeksforGeeks</center> 

Font tag: It is used to specify the font size, font color and font-family in html document.
Syntax:
<font> Statements ... <font>

Example:
<font face="Times New Roman">Example</font>  

Empty (Non-Container) Tags:
Line break tag: It is used to break the line.
Syntax:
<br>

Example:
GeeksforGeeks<br>A computer science portal 

Image tag: It is used to add image element in html document.
Syntax:
<img>

Example:
<img src="gfg.jpg" width="40" height="40" border="0"> 

Link tag: It is used to link the content from external source.
Syntax:
<link>

Example:
<head> 
<link rel="stylesheet" type="text/css" href="style.css"> 
</head> 

Horizontal rule tag: It is used to display the horizontal line in html document.
Syntax:
<hr/>

Example:
<hr width="50%" size="3" /> 

Meta tag: It is used to specify the page description. For example: last modifier, authors, … etc.
Syntax:
<meta> Statements ... <meta>

Example:
<meta name="Description"   content="Description of your site">  
<meta name="keywords"  content="keywords describing your site"> 

Tables Tags: Table tag is used to create a table in html document.
Table tag:
Syntax:
<table> Statements... </table>

Example:
<table border="4" cellpadding="2" cellspacing="2" width="100%">  
<tr> <td>Column 1</td> 
<td>Column 2</td> </tr> </table> 

Tr tag: It is used to define row of html table.
Syntax:
<tr> Statements... </tr>

Example:
<table> 
  <tr> 
    <th>Month</th> 
    <th>Savings</th> 
  </tr> 
  <tr> 
    <td>January</td> 
    <td>$100</td> 
  </tr> 
</table> 

Th tag: It defines the header cell in a table. By default it set the content with bold and center property.
Syntax:
<th> Statements ... <th>

Example:
<table> 
 <tr> 
   <th>Month</th> 
   <th>Savings</th> 
 </tr> 
 <tr> 
   <td>January</td> 
   <td>$100</td> 
 </tr> 
</table> 

Td tag: It defines the standard cell in html document.
Syntax:
<td> Statements ... <td>

Example:
<table> 
  <tr> 
    <td>Cell A</td> 
    <td>Cell B</td> 
  </tr> 
</table> 

Input Tags:
Form tag: It is used to create html form for user.
Syntax:
<form> Statements ... <form>

Example:
<form action="mailto:you@yourdomain.com "> 
  Name: <input name="Name" value="" size="80"><br> 
  Email: <input name="Email" value="" size="80"><br>  
  <br><center><input type="submit"></center> 
</form> 

Submit input tag: It is used to take the input from the user.
Syntax:
<input>

Example:
<form method=post action="/cgibin/example.cgi"> 
<input type="text" style="color: #ffffff; 
 font-family: Verdana; font-weight: bold; 
 fontsize: 12px; background-color: #72a4d2;"  
 size="10" maxlength="30">  
<input type="Submit" value="Submit">  
</form> 

Dropdown option tag: It is used to select an option froma drop-down list.
Syntax:
<option> Statements ... <option>

Example:
<form method=post action="/cgibin/example.cgi">  
<center> Select an option:<select> 
<option>option 1</option> 
<option selected>option 2</option> 
<option>option 3</option>  
</form>  

Radio button tag: It is used to select only one option from the given options.
Syntax:
<input>

Example:
<form method=post action="/cgibin/example.cgi">  
Select an option:<br>  
<input type="radio" name="option"> Option 1 
<input type="radio" name="option" checked> Option 2 
<input type="radio" name="option"> Option 3  

Share:

Flow Control and Looping Statements in java, javsscript, VB .Net

 Flow control statements determine the next statement to execute. In this sense, the statements if-else, if, switch, while, for are flow control statements.
The If statement
Syntax:

If (expression)
    statement
End If

The If keyword is used to check if an expression is true. If it is true, a statement is then executed. The statement can be a single statement or a compound statement. A compound statement consists of multiple statements enclosed by the If/End If block.

Option Strict On

Module Example

    Dim num As Byte = 31

    Sub Main()

        If (num > 0)
            Console.WriteLine("num variable is positive")
        End If

    End Sub

End Module

We have a num variable. It is assigned 31. The If keyword checks for a boolean expression. The expression is put between square brackets. The 31 > 0 is true, so the statement inside the block is executed.

$ ./ifstatement.exe 
num variable is positive

The condition is met and the message is written to the console.

Option Strict On


Module Example

    Dim num As Byte = 31

    Sub Main()

        If (num > 0)
            Console.WriteLine("num variable is positive")
            Console.WriteLine("num variable equals {0}", num)
        End If

    End Sub

End Module

More statements can be executed inside the block, created by the If, End If keywords.

We can use the Else keyword to create a simple branch. If the expression inside the square brackets following the If keyword evaluates to false, the statement following the Else keyword is automatically executed.

Option Strict On


Module Example

    Dim sex As String 

    Sub Main()

        sex = "female"

        If (sex = "male") 
          Console.WriteLine("It is a boy")
        Else 
          Console.WriteLine("It is a girl")
        End If

    End Sub

End Module

We have a sex variable. It has "female" string. The boolean expression evaluates to false and we get "It is a girl" in the console.

$ ./branch.exe 
It is a girl

We can create multiple branches using the Else If keyword. The Else If keyword tests for another condition if and only if the previous condition was not met. Note that we can use multiple Else If keywords in our tests.

Option Strict On


Module Example

    Dim a As Byte = 0

    Sub Main()

        If (a < 0) 
          Console.WriteLine("a is negative")
        Else If (a = 0) 
          Console.WriteLine("a equals to zero")
        Else
          Console.WriteLine("a is a positive number")
        End If

    End Sub

End Module

We have a numerical variable and we test it if it is a negative number or positive or if it equals to zero. The first expression evaluates to false. The second condition is met. The program prints 'a equals to zero' to the console. The rest of the branch is skipped.

Select statement
The Select statement is a selection control flow statement. It allows the value of a variable or expression to control the flow of program execution via a multi way branch. It creates multiple branches in a simpler way than using the combination of If, Else If statements.

We have a variable or an expression. The Select keyword is used to test a value from the variable or the expression against a list of values. The list of values is presented with the Case keyword. If the values match, the statement following the Case is executed. There is an optional Case Else statement. It is executed if no other match is found.

Option Strict On

Module Example

    Dim domain As String

    Sub Main()

        domain = Console.ReadLine()
    
        Select domain
            Case "us"
                Console.WriteLine("United States")
            Case "de"
                Console.WriteLine("Germany")
            Case "sk"
                Console.WriteLine("Slovakia")
            Case "hu"
                Console.WriteLine("Hungary")
            Case Else
                Console.WriteLine("Unknown")
        End Select

    End Sub

End Module

In our program, we have a domain variable. We read a value for the variable from the command line. We use the Case statement to test for the value of the variable. There are several options. If the value equals for example to "us" the "United States" string is printed to the console.

$ ./selectcase.exe 
hu
Hungary

We have entered "hu" string to the console and the program responded with "Hungary".

The Select keyword enables to validate a range of numerical cases.

Option Strict On

Module Example

    Dim age As Byte

    Sub Main()

        Try
            age = Console.ReadLine()
        Catch
            Console.WriteLine("Invalid value")
            End
        End Try
    
        Select age
            Case 0 To 21
                Console.WriteLine("Junior")
            Case 22 To 60
                Console.WriteLine("Adult")
            Case Else
                Console.WriteLine("Senior")
        End Select

    End Sub

End Module

The preceding program uses range of numerical values to identify an age group of a person.

Try
    age = Console.ReadLine()
Catch
    Console.WriteLine("Invalid value")
    End
End Try

A value is read from the console. We can use only numerical data. The Try, Catch, End Try keywords are used for exception handling. If an exception is thrown, the statements following the Catch keyword are executed. The End statement terminates the program.

Case 0 To 21
    Console.WriteLine("Junior")

Here we specify a range of values. If the value entered by the user is in between 0 and 21, inclusive, then the program prints "Junior" to the console.

$ ./agerange.exe 
43
Adult

We have entered 43 and the program responded with the "Adult" string.

The While statement
The While statement is a control flow statement that allows code to be executed repeatedly based on a given boolean condition.

Sybtax:

While (expression):
    statement
End While

The While keyword executes the statements inside the block enclosed by the While, End While keywords. The statements are executed each time the expression is evaluated to true.

Option Strict On

Module Example

    Sub Main()

        Dim i As Integer = 0
        Dim sum As Integer = 0

        While i < 10

            i = i + 1
            sum += i
            
        End While

        Console.WriteLine(sum)

    End Sub

End Module

In the code example, calculate the sum of values from a range of numbers.

The While loop has three parts: initialization, testing, and updating. Each execution of the statement is called a cycle.

Dim i As Integer = 0

We initiate the i variable. It is used as a counter.

While i < 10
...
End While

The expression following the While keyword is the second phase, the testing. The statements in the body are executed, until the expression is evaluated to false.

i = i + 1

The last, third phase of the While loop. The updating. We increment the counter. Note that improper handling of the While loops may lead to endless cycles.

It is possible to run the statement at least once. Even if the condition is not met. For this, we can use the Do, Loop While keywords.

Option Strict On

Module Example

    Sub Main()

        Dim count As Integer = 0
        
        Do 
            Console.WriteLine(count)
        Loop While (count <> 0)

    End Sub

End Module

First the iteration is executed and then the truth expression is evaluated.

The For Next statements
When the number of cycles is know before the loop is initiated, we can use the For Next statements. In this construct we declare a counter variable, which is automatically increased or decreased in value during each repetition of the loop.

Option Strict On

Module Example

    Sub Main()

        For i As Integer = 0 To 9
            Console.WriteLine(i)
        Next

    End Sub

End Module

In this example, we print numbers 0..9 to the console.

For i As Integer = 0 To 9
    Console.WriteLine(i)
Next

We initiate the counter i to zero. The Next statement increases the counter by one until the counter equals to 9.

Visual Basic has an optional Step keyword. It controls how the counter variable is going to be increased or decreased.

Option Strict On

Module Example

    Sub Main()

        For i As Integer = 9 To 0 Step -1
            Console.WriteLine(i) 
        Next

    End Sub

End Module

In the above example, we print numbers 0..9 in the reverse order.

For i As Integer = 9 To 0 Step -1
    Console.WriteLine(i) 
Next

The step may be a negative number too. We initiate the counter to 9. Each iteration the counter is decreased by the step value.

The For Each statement
The For Each construct simplifies traversing over collections of data. It has no explicit counter. The For Each statement goes through the array or collection one by one and the current value is copied to a variable defined in the construct.

Option Strict On

Module Example

    Sub Main()
        
        Dim planets() As String = { "Mercury", "Venus", _
            "Earth", "Mars", "Jupiter", "Saturn", _
            "Uranus", "Neptune" }

        For Each planet As String In planets
            Console.WriteLine(planet)
        Next 
        
    End Sub

End Module

In this example, we use the For Each statement to go through an array of planets.

For Each planet As String In planets
    Console.WriteLine(planet)
Next

The usage of the For Each statement is straightforward. The planets is the array that we iterate through. The planet is a temporary variable that has the current value from the array. The For Each statement goes through all the planets and prints them to the console.

$ ./planets.exe 
Mercury
Venus
Earth
Mars
Jupiter
Saturn
Uranus
Neptune

Running the above Visual Basic program gives this output.

The Exit, Continue statements
The Exit statement can be used to terminate block defined by While, For or Select statements.

Option Strict On

Module Example

    Dim val As Integer

    Sub Main
        
        While (True)
        
            val = CType((30 * Rnd), Integer) + 1
            Console.Write(val.ToString & " ")
            If (val = 22)
                Exit While
            End If        

        End While

        Console.Write(vbNewLine)

    End Sub

End Module

We define an endless While loop. There is only one way to jump out of a such loop. We must use the Exit While statement. We choose a random value from 1 to 30. We print the value. If the value equals to 22, we finish the endless while loop.

$ ./exitstm.exe 
30 12 13 20 19 4 2 9 6 9 22 

We might get something like this.

The Continue statement is used to skip a part of the loop and continue with the next iteration of the loop. It can be used in combination with Do, For and While statements.

In the following example, we will print a list of numbers that cannot be divided by 2 without a remainder.

Option Strict On

Module Example

    Dim num As Integer = 0

    Sub Main()
        
        While (num < 1000)
        
            num = num + 1

            If ((num Mod 2) = 0)
                Continue While
            End If        

            Console.Write(num.ToString() + " ") 

        End While

        Console.Write(vbNewLine)

    End Sub

End Module

We iterate through numbers 1..999 with the While loop.

If ((num Mod 2) = 0)
    Continue While
End If  

If the expression num Mod 2 returns 0, the number in question can be divided by 2. The Continue statement is executed and the rest of the cycle is skipped. In our case, the last statement of the loop is skipped and the number is not printed to the console. The next iteration is started.
Share:

Flow Control and Looping Statements in java, javsscript, c#

 Flow control statements determine the next statement to execute. In this sense, the statements if-else, if, switch, while, for are flow control statements.
Conditional Statements:
    Conditional statements control whether a part of a script is executed depending the result of a particular expression (i.e. whether an expression returns a boolean true or false value). The two types of conditional structures are if and if ... else. In this section we will take a closer look at both of these conditional structures and provide some examples of their use.
Syntax:
if (condition)
{
   ...
} else if (condition1)
{
   ...
} else
{
   ...
}

Example: ( in javascript )
if (customerName == "Fred")
{
      document.write ("Hello Fred!");
} 
else if (customerName == "John")
{
      document.write ("Hello John!");
} 
else
{
      document.write ("You're not Fred! Where's Fred?");
}

Looping Statements:
1. for loops
Syntax:
for ( ''initializer''; ''conditional expression''; ''loop expression'' )
{
      statements to be executed
}

The initializer typically initializes a counter variable. Traditionally the variable i is used for this purpose. For example:
i = 0

This sets the counter to be the value i and sets it to zero.

The conditional expression specifies the test to perform to verify whether the loop has been performed the required number of times. For example, if we want to loop 100 times:

i < 100

Finally the loop expression specifies the action to perform on the counter variable. For example to increment by 1:

i++

Bringing this all together we can create a for loop to perform the task outlined in the earlier example:

var j = 10;

for (i=0; i<10; i++)
{
      j += j;
}

2. while loops: The for loop described above works well when you know how many times a particular task needs to be repeated. Clearly there will often be instances where something needs to be repeated until a certain condition is met, with no way of knowing how many repetitions are going to be needed to meet those criteria. To address this need JavaScript provides the while loop. In essence the while loop repeats a set of tasks until a specified condition is met.
Syntax:
while (''condition'')
{
      ''Statements''
}

    In that above syntax outline, condition is an expression that will return either true or false and JavaScript Statements represents the JavaScript to be executed while the expression is true. For example:

while ( i < 10 )
{
      i = i + j;
}

    In the above example, the while expression will evaluate whether i is less than 10. If it is already greater than 10 then the code in the braces is skipped and the loop exits without performing any tasks. If it is not greater than 10 the code in the braces is executed and the loop returns to the while statement and repeats the evaluation of i. This process repeats until i is greater than 10, at which point the loop exits

switch Statements: when a need arises to evaluate a large number of conditions. An easier way to handle such situations is to use the switch statement.
Syntax:
switch (''value'')
{
     case "''match1''" :
     ''statements''
     break;

     case "''match2''" :
     ''statements''
     break;

     case "''match3''" :
     ''statements''
     break;

     case "''match4''" :
     ''statements''
     break;

     case "''match5''" :
     ''statements''
     break;

     default :
     ''statements''
     break;
}
    There can be any number of case statements - basically as many as you need to fully compare the value in the switch statement against the possible options (represented by match1 through to match5 in the above example) specified by the case statements. When a match is found the statements corresponding to the matching case are executed. Note the break; statement. Without the break all the cases after the matching case will also be executed.

    The default statement specifies the action that should be taken if no match is found. The following provides an example of the switch statement in action:

Example: (in javascript)
var carModel = "Focus";

switch (carModel)
{
     case "Durango" :
     document.write ("Manufactured by Dodge");
     break;

     case "Camry" :
     document.write ("Manufactured by Toyota");
     break;

     case "Focus" :
     document.write ("Manufactured by Ford");
     break;

     case "320i" :
     document.write ("Manufactured by BMW");
     break;

     case "Civic" :
     document.write ("Manufactured by Honda");
     break;

     default  :
     document.write ("Unknown Car Model");
     break;
}

Breaking a Loop: Occasionally it is necessary to exit from a loop before it has met whatever completion criteria were specified. To achieve this, the break statement must be used. The following example contains a loop that uses the break statement to exit from the loop when i = 100, even though the loop is designed to iterate 1000 times:

for (i = 0; i < 1000; i++)
{
        if (i == 10) 
        {
             break;
        }
}

Skipping Statements in Current Loop Iteration: The break statement, when encountered in a loop breaks skips all remaining statements in the loop body and breaks the loop. The continue statement also skips all remaining statements in the loop for the current iteration, but returns to the top of the loop and allows it to continue running.
Share:
Powered by Blogger.

Recent Posts

Pages